

Table of Contents
- Why Outdoor Kitchen Refrigeration Placement Matters
- Step 1: Plan Your Outdoor Kitchen Layout and Workflow
- Step 2: Determine Outdoor Refrigerator Placement Distance from Heat Sources
- Step 3: Assess Built-In Outdoor Refrigerator Ventilation Requirements
- Step 4: Verify Outdoor Refrigerator Clearance Requirements for Your Model
- Step 5: Account for Sun Exposure, Shade, and Ambient Temperature
- Small Outdoor Kitchen Refrigerator Ideas and Space-Saving Placement
- Step 6: Finalize Power, Drainage, and Installation Logistics
- Frequently Asked Questions
Last Updated: October 16, 2026
Why Outdoor Kitchen Refrigeration Placement Matters
Outdoor kitchen refrigeration placement determines whether your entertaining space runs smoothly or becomes a source of frustration. The location of your refrigerator affects food safety, workflow efficiency, and how long your appliance lasts in outdoor conditions.
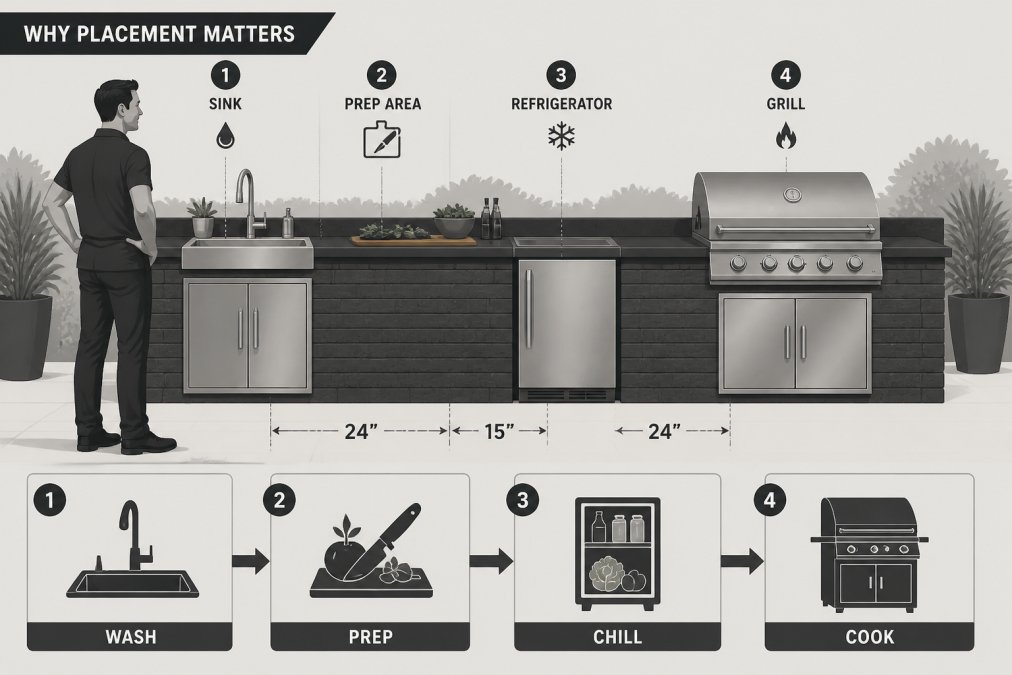
Most homeowners treat refrigerator placement as an afterthought. They position it wherever space opens up, then discover problems mid-summer: the compressor overheats from nearby grills, the door swings into traffic, or condensation builds up because ventilation gets blocked.
At Urban Man Caves, we've helped countless customers redesign their outdoor kitchens to prioritize smart refrigerator positioning. The difference between a thoughtful layout and a reactive one shows up immediately in how you cook, entertain, and maintain your equipment.
This guide walks you through six essential steps to position your outdoor kitchen refrigeration correctly. You'll learn how appliance placement affects your workflow, what clearance and ventilation your unit needs, and how environmental factors influence performance.
Step 1: Plan Your Outdoor Kitchen Layout and Workflow
Start by mapping your outdoor kitchen layout before choosing where your refrigerator goes. The placement decision depends on how you actually cook and entertain, not on available space alone.
Understanding the Work Triangle
The work triangle is the invisible line connecting your three main work zones: the grill, the sink, and the refrigerator. This concept, borrowed from indoor kitchens, applies directly to outdoor spaces.
Your refrigerator should sit within easy reach of your prep area. If you're grabbing ingredients, marinating meat, or pulling out drinks for guests, a nearby fridge saves steps and keeps food safe. The ideal distance is 3 to 6 feet from your prep counter and sink.
When the refrigerator sits too far away, you make unnecessary trips. Food sits out longer during preparation. Drinks warm up before guests grab them. A well-positioned outdoor kitchen refrigerator keeps everything accessible without cluttering your cooking zone.
Choosing Your Layout Configuration
Your outdoor kitchen layout determines where the refrigerator fits best. Common configurations include straight-line, L-shaped, and island layouts.
Straight-line layout: All appliances run along one wall or counter edge. Your grill, sink, and refrigerator line up in sequence. This works well for narrow spaces and tight budgets. Place the refrigerator at one end, away from heat-producing appliances.
L-shaped layout: Appliances form an L. The refrigerator typically occupies one corner, the grill another. This creates natural separation between cold and hot zones. It also gives you two work surfaces at right angles, improving workflow during entertaining.
Island layout: Your outdoor kitchen island sits in the center of your patio or deck. The refrigerator integrates into the island cabinetry. This approach works best for larger spaces where you want 360-degree access and a focal point for gathering.
Think about where guests stand while you cook. Position the refrigerator so you can access it without turning your back on your audience or stepping into the grill's heat zone.
Step 2: Determine Outdoor Refrigerator Placement Distance from Heat Sources
Heat is the enemy of outdoor refrigerator performance. Your unit's compressor works harder when ambient temperature rises, consuming more energy and shortening the appliance's lifespan.

Keep your refrigerator at least 3 feet away from your grill or any heat-producing cooking appliance. Some manufacturers recommend 5 feet or more, depending on the model. Check your specific unit's documentation for exact requirements.
Why this distance matters: A grill radiates intense heat during cooking. When your refrigerator sits too close, the compressor must work overtime to maintain cold temperatures. Over a summer season, this extra strain adds up.
Position your refrigerator on the opposite end of your outdoor kitchen layout from your grill. If your layout includes an oven or range, apply the same distance rule. These appliances generate sustained heat that affects refrigeration efficiency.
Wind direction matters too. In many locations, prevailing winds push grill heat in one direction. Position your refrigerator upwind when possible, so heat blows away from the unit rather than toward it.
Step 3: Assess Built-In Outdoor Refrigerator Ventilation Requirements
Ventilation is critical for outdoor refrigerator performance. Your unit needs airflow around the condenser coils to release heat and maintain proper cooling.
Most outdoor refrigerators require at least 2 inches of clearance on the sides and back. Some models need more. Before finalizing your placement, check the manufacturer's specifications for your exact outdoor refrigeration unit.
Never position your refrigerator directly against a wall or cabinetry that blocks rear airflow. Heat builds up behind the unit, forcing the compressor to work harder. This reduces cooling efficiency and increases energy costs.
If you're integrating the refrigerator into a built-in outdoor kitchen island, plan for ventilation openings in the cabinetry. Ensure the back panel has adequate venting. Some premium outdoor kitchens include ventilation ducts that pull hot air away from the refrigerator compartment.
Blocked ventilation is one of the most common reasons outdoor refrigerators fail prematurely. Homeowners cut cabinetry too tightly around the unit or place it in an enclosed space. The appliance overheats, the compressor shuts down, and food spoils.
Step 4: Verify Outdoor Refrigerator Clearance Requirements for Your Model
Every refrigerator model has specific clearance requirements. These specifications ensure the door opens fully, the unit ventilates properly, and technicians can service the appliance if needed.
Measure your space carefully before purchasing. Common outdoor refrigerator dimensions range from compact 15-inch models to larger 27-inch units. The National Kitchen & Bath Association guidelines recommend accounting for both the appliance footprint and the space needed for door swing.
Check three measurements: width, depth, and height. For outdoor kitchen refrigeration placement, depth is especially important. Built-in units often sit deeper than you expect because the compressor and ventilation components extend behind the front panel.
Measuring Door Swing and Access Zones
Your refrigerator door needs to open fully without hitting countertops, cabinetry, or foot traffic. Measure the swing radius from the hinge point to the door's outer edge when fully open.
If your refrigerator is left-hinged, the door swings to the left. If right-hinged, it swings right. Choose the hinge orientation based on your layout and traffic flow. The door should swing into open space, not toward your cooking zone or a high-traffic area.
Premium Compact Refrigerator SS - LH →
Allow at least 3 feet of clear space in front of the refrigerator for comfortable access. This gives you room to open the door and reach inside without awkward stretching or bumping into nearby appliances.
Consider how guests move through your outdoor kitchen. If people walk behind you while you're accessing the refrigerator, you'll have constant interruptions. Position the unit in a location where access doesn't conflict with entertaining traffic.
Step 5: Account for Sun Exposure, Shade, and Ambient Temperature
Sun exposure dramatically affects outdoor refrigerator performance. Direct sunlight heats the exterior, forcing the compressor to work harder to maintain cold interior temperatures.
Position your refrigerator in the shadiest part of your outdoor kitchen when possible. If shade isn't available, install a shade structure like a pergola or awning above the unit.
Ambient temperature matters too. Outdoor refrigerators are engineered to handle hot conditions, but extreme heat still affects performance.
Check your unit's operating specifications. Most outdoor refrigerators function reliably in temperatures up to 110 degrees. However, performance degrades as temperatures rise. Some units include thermostatic controls that adjust compressor speed based on ambient temperature.
Humidity also plays a role. Coastal areas and humid climates create condensation challenges. Your refrigerator's exterior can develop rust or corrosion if moisture accumulates on stainless steel surfaces.
Evening cooking requires good lighting around your refrigerator. Position the unit where outdoor lighting reaches it clearly. This prevents fumbling in darkness when you're retrieving items during nighttime entertaining.
Small Outdoor Kitchen Refrigerator Ideas and Space-Saving Placement
Limited space doesn't mean you can't have reliable refrigeration. Compact outdoor refrigerators deliver serious cooling capacity in smaller footprints.
Compact Refrigerator Models for Limited Footprints
The Blaze 15-Inch Outdoor Refrigerator offers a slim profile that fits tight spaces while holding up to 74 beverage cans. This model works perfectly for small patios, apartment balconies, or as a secondary beverage station. At 15 inches wide, it slides into narrow gaps between other appliances or against a wall.
For homeowners wanting more capacity without a massive footprint, the Premium Compact Refrigerator SS delivers 4.2 cubic feet of storage in a left-hinged design. This unit includes a specialized crisper drawer for vegetables and a vertical can dispenser track. It's engineered specifically for outdoor kitchen islands, making it ideal for built-in installations.

If you're serious about entertaining, the Glass Front Outdoor Beverage Cooler holds 84 cans and 22 wine bottles simultaneously. The glass front lets guests see your drink selection without opening the door, which keeps the interior cold and reduces energy waste. This model works as both a beverage center and wine fridge.
Island Integration and Cabinetry Alignment
When integrating a compact refrigerator into an outdoor kitchen island, align the unit's front edge with your countertop. This creates a seamless appearance and prevents the refrigerator from protruding awkwardly.
Plan your island cabinetry around your refrigerator's exact dimensions. Measure twice. Undersizing the opening forces you to trim cabinetry after the fact, creating gaps and airflow problems. Oversizing leaves ugly spaces that collect debris.
Position the refrigerator so the door handle aligns with your island's overall design aesthetic. If you're using the FireMagic Outdoor Rated Refrigerator, its integrated Fire Magic style handle coordinates with matching grills and cookware, creating visual continuity across your entire outdoor cooking setup.
Leave at least 2 inches of clearance on all sides of the refrigerator for ventilation. This space is non-negotiable, even if it means adjusting your island's overall dimensions.
Step 6: Finalize Power, Drainage, and Installation Logistics
Your refrigerator placement must account for electrical connections and drainage needs. These practical considerations often determine where the unit actually goes.
Locate a weatherproof electrical outlet within 6 feet of your refrigerator. Outdoor outlets must be GFCI-protected according to electrical code. If no outlet exists near your planned location, you'll need to install one.
Some outdoor refrigerators include drainage ports that expel condensation water. Position the unit where this water can drain safely away from your patio or deck.
Plan your installation sequence carefully. If you're building a custom outdoor kitchen island, install electrical wiring and drainage before cutting cabinetry openings. This prevents mistakes and saves time during assembly.
Consider future maintenance. Ensure technicians can access the refrigerator's rear panel if the compressor needs service. Don't box in the unit so tightly that removal becomes impossible.
Test your layout before committing to permanent installation. Place a cardboard box or temporary structure where your refrigerator will go.
Proper outdoor kitchen refrigeration placement sets your entire outdoor entertaining space up for success.
Urban Man Caves offers premium outdoor refrigeration options designed specifically for built-in kitchen islands and high-end entertaining spaces. The FireMagic Outdoor Rated Refrigerator delivers 5.1 cubic feet of weather-resistant storage with 304 stainless steel construction and digital temperature control.

Frequently Asked Questions
How far should an outdoor refrigerator be from the grill?
Position your outdoor refrigerator at least 3 to 5 feet away from heat-producing appliances like grills and ovens. This distance prevents the compressor from working overtime to maintain cool temperatures and protects internal components from thermal stress. If space is tight, use a heat shield or install a solid barrier between the refrigerator and grill to reduce radiant heat exposure.
Does a built-in outdoor refrigerator need ventilation?
Yes. Built-in outdoor refrigerator ventilation is critical for proper operation. Leave at least 2 inches of clearance on the sides and rear of the unit to allow air to circulate around the condenser. Without adequate airflow, the compressor overheats, cooling efficiency drops, and the unit may fail prematurely. Check your refrigerator's manual for specific ventilation requirements.
Can an outdoor refrigerator be placed in direct sunlight?
Avoid placing outdoor refrigeration in direct sunlight whenever possible. Extended UV exposure and heat buildup force the compressor to run constantly, increasing energy consumption and shortening the appliance's lifespan. If your layout requires sun exposure, install a shade structure like an awning, pergola, or umbrella above the unit, or position it on the north or east side of your outdoor kitchen where afternoon shade is available.
What is the best refrigerator option for a small outdoor kitchen?
For small outdoor kitchen refrigerator ideas, consider compact models like the Blaze 15-Inch Outdoor Refrigerator ($899), which holds up to 74 cans in a slim 15-inch-wide footprint. Alternatively, the Premium Compact Refrigerator SS ($1,574) offers 4.2 cubic feet of storage with a moisture-regulated crisper and can dispenser track. Both fit into tight spaces while maintaining efficient cooling and durable stainless steel construction.


