

You've loaded a smoker with beautiful strips of beef, turkey, or venison, only to find that the pieces nearest the heat are brittle while the center strips are still glossy and soft. The recipe may be fine. The smoker may be holding temperature. In many batches, the failure starts with the rack.
Jerky smoking racks do more than support meat. They determine how much air can reach each strip, how smoke moves through the chamber, and whether moisture escapes evenly. A rack that fits poorly or sits too close to the wall can create hot spots, blocked airflow, and inconsistent texture. The right setup turns the rack into part of the drying system, not just another accessory.
Table of Contents
- Why Jerky Smoking Racks Make or Break Your Batch
- Choosing the Right Jerky Smoking Rack for Your Smoker
- Smoker Setup and Airflow That Delivers Even Drying
- From Prep to Smoke How to Make Jerky on Racks
- Food Safety Cooling and Storage for Lasting Freshness
- Rack Care Troubleshooting and Your Next Batch
Why Jerky Smoking Racks Make or Break Your Batch
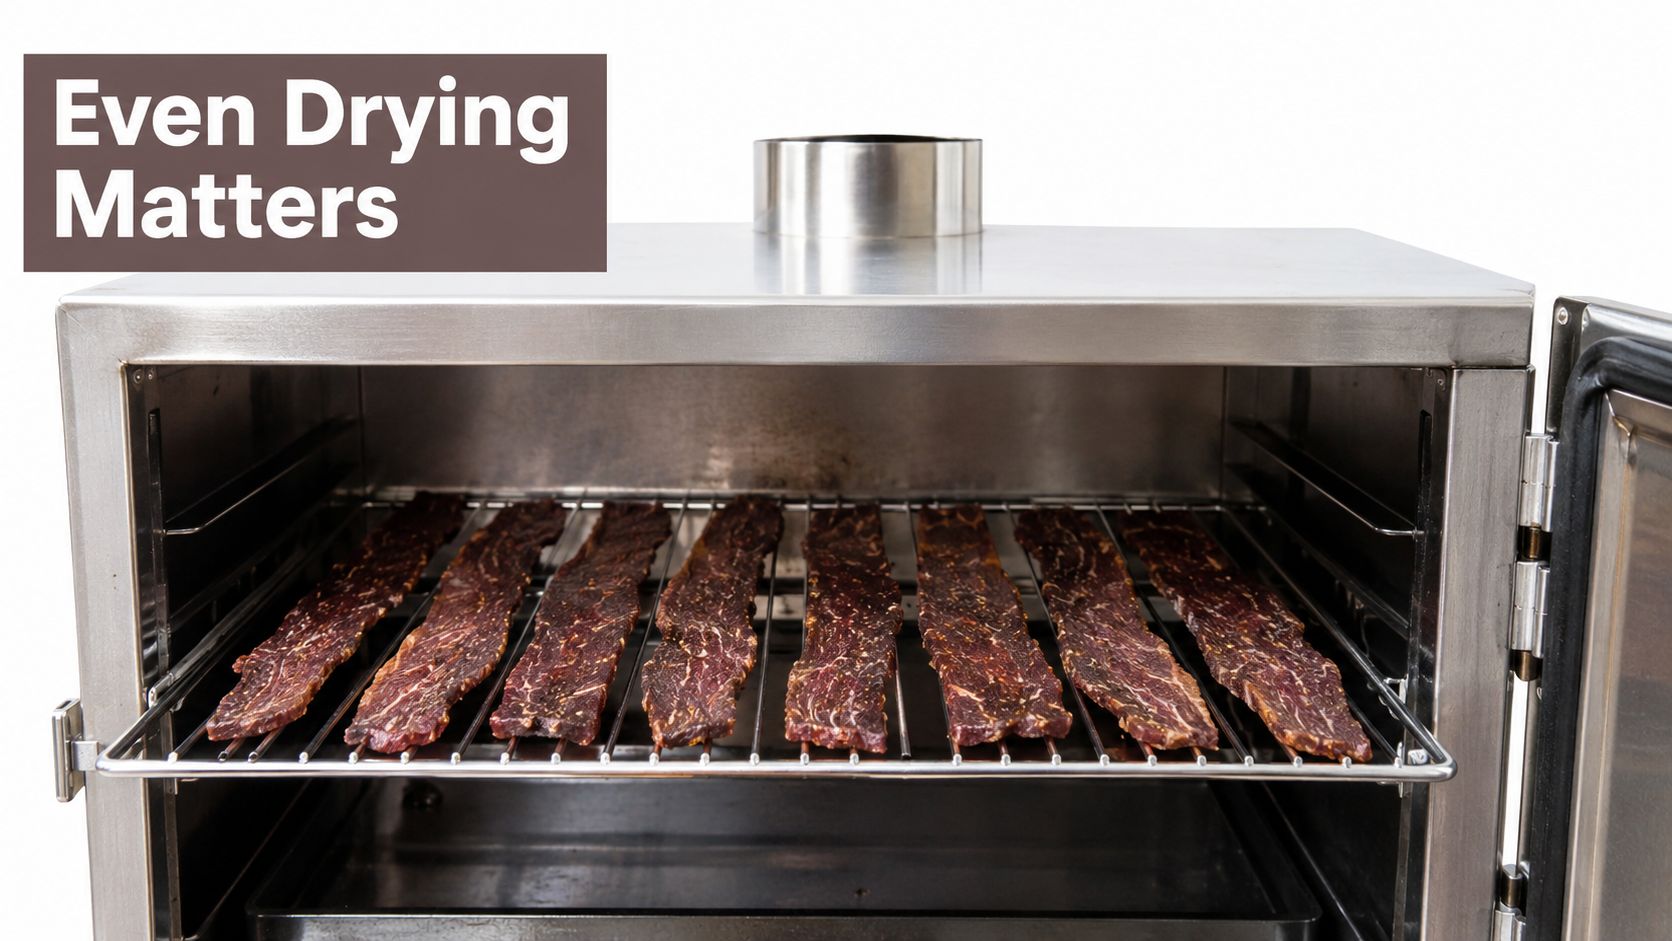
The rack is often the cause when outer strips turn brittle before the center finishes drying. Crowded strips touch, overlap, and trap moisture at their edges, leaving damp seams while exposed surfaces darken. By the time the outside pieces look ready, thicker sections may still be too moist.
Arrange meat in a single layer, close together but never touching or overlapping, so air can circulate around every strip. University and USDA guidance places jerky in a smoker, dehydrator, or oven held around 140°F to 170°F, with the meat reaching 160°F internally before or during drying. Drying can take about 3 to 6 hours in a smoker, while another preparation may take 10 to 24 hours when the meat isn't preheated in marinade.
The rack controls more than capacity
A standard grate suits steaks, burgers, and larger cuts. Jerky needs steadier support. Small strips can sag between wide bars, curl into neighboring pieces, or sit directly above a hot section. Fine mesh supports the full strip while allowing smoke and heated air to reach its surface.
Rack geometry matters as much as material. A large rack forced into a narrow chamber can restrict airflow more than a smaller rack with clear space around it. Wall clearance gives air a route around the load and prevents edge strips from drying at a different rate. A stackable system adds capacity only when its vertical gaps let smoke pass between levels instead of forming a dense wall of meat.
Practical rule: If you cannot see open space around the strips after loading, the rack is working against you.
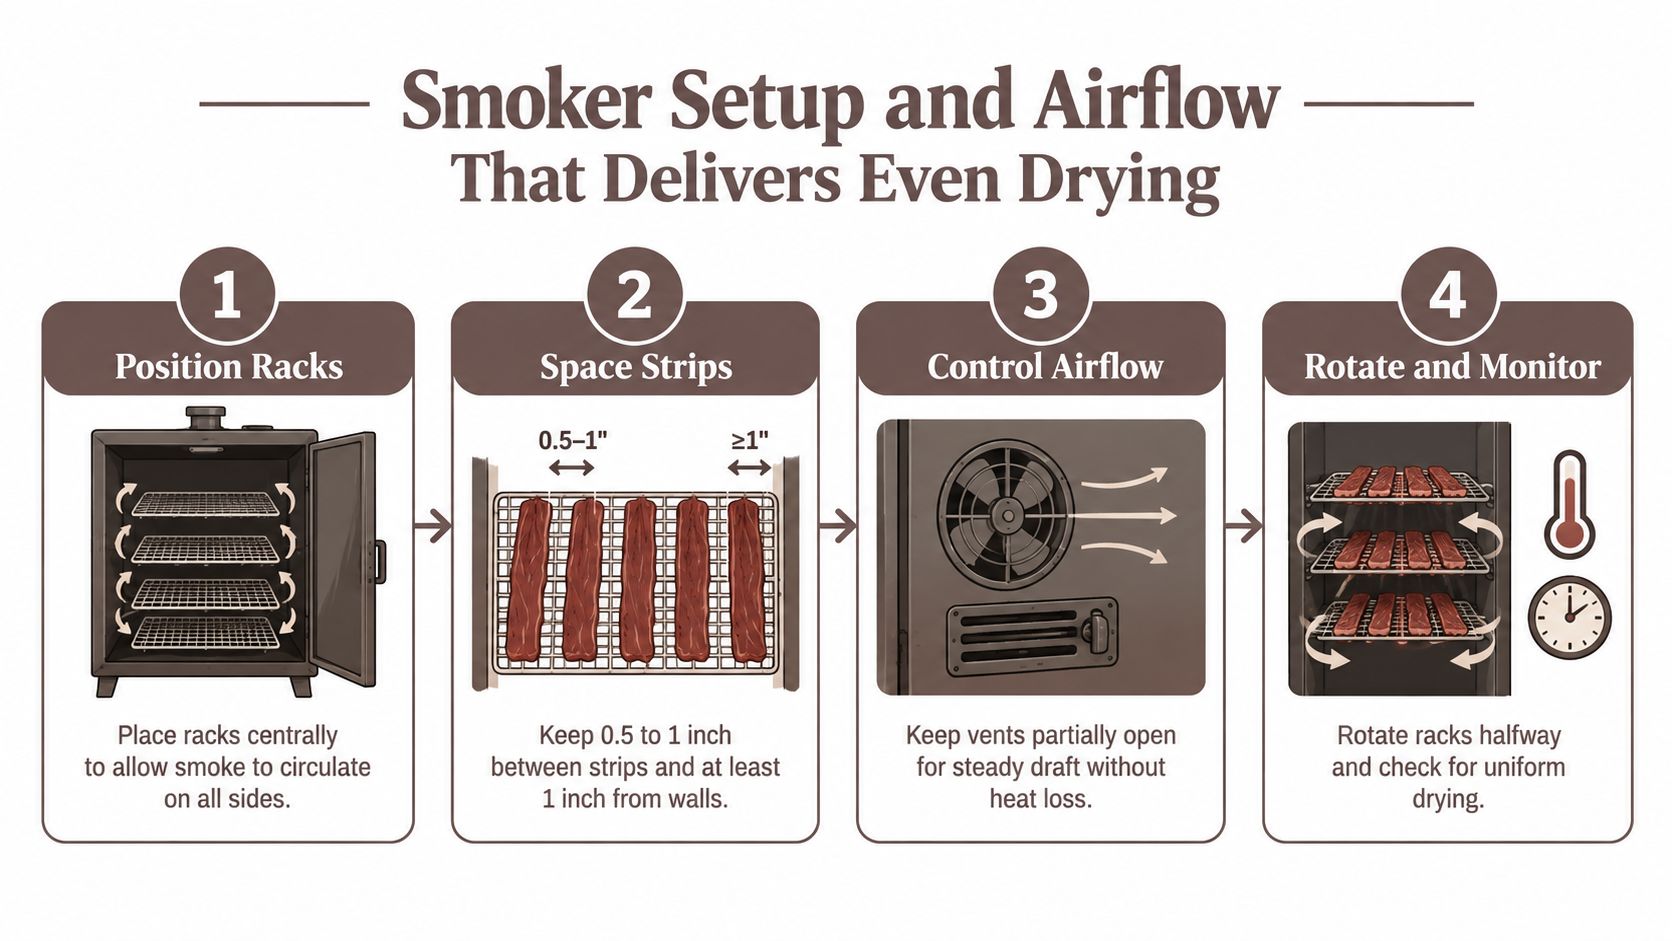
Spacing must be part of the rack decision, not an afterthought. Jerky guidance commonly recommends 0.5 to 1 inch between strips and at least 1 inch between racks, which helps preserve airflow and limit glossy, under-dried spots. The jerky rack airflow guide from PS Seasoning also recommends rotating racks or strips during the cook because smokers rarely dry every position at the same rate.
A good batch comes from treating the rack, chamber walls, vents, heat source, and meat layout as one system. Measure the usable interior first, then choose a rack that leaves room for air to move around every piece. A rack that holds fewer strips but dries them evenly is more useful than a full rack that creates hot edges and damp centers.
Choosing the Right Jerky Smoking Rack for Your Smoker
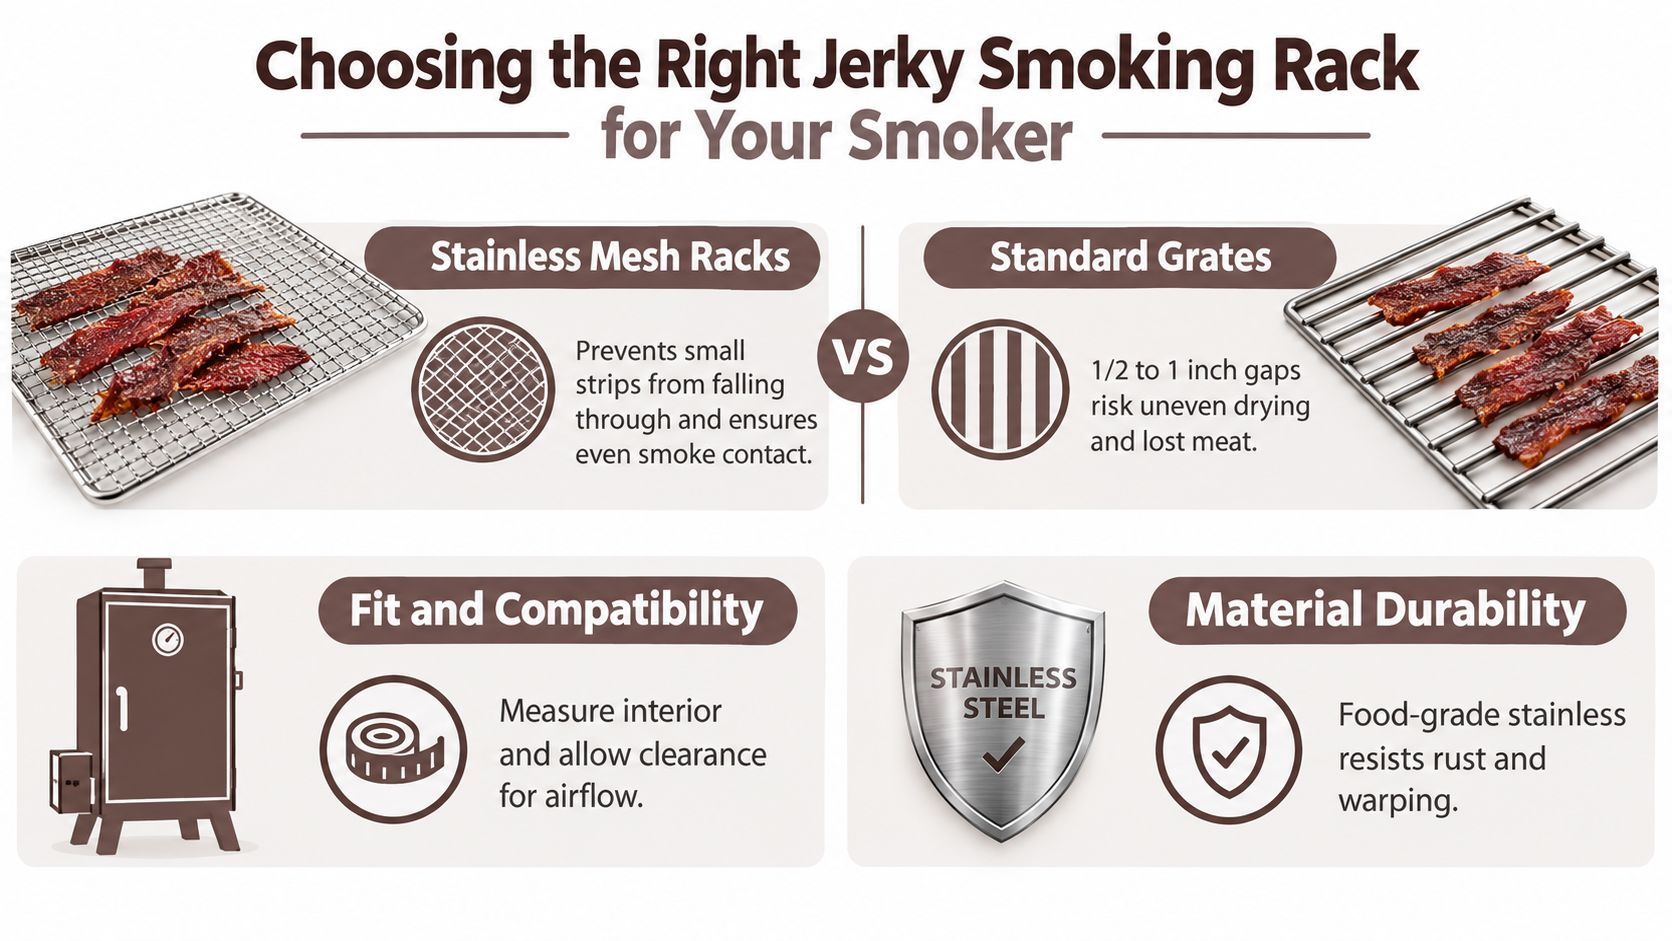
A rack can fit the grate and still dry jerky poorly. Before buying one, measure the smoker's usable cooking area rather than its advertised exterior. Record the interior width and depth where the rack will sit. Then check the vertical distance between shelves, the heat-source position, and the route from intake to exhaust.
Measure the chamber before choosing the rack
Leave about 1 inch between the rack and the smoker walls. That gap gives air a route around the meat and lets you lift the rack without scraping strips against the chamber. A rack that spans the full width can force smoke around the load unevenly, leaving edge pieces exposed while airflow stalls near crowded sections.
Stainless mesh versus standard grates
Stainless mesh racks are usually the practical choice for thin strips. Mesh around 1/4 inch supports small pieces, keeps them from dropping through, and exposes more surface to smoke. Food-grade stainless steel resists rust and is less likely to distort during repeated cooks.
Standard grates work when their bars provide firm support, but gaps of 1/2 to 1 inch can be too wide for jerky. Thin pieces may fall through, sag between bars, or dry unevenly when only part of a strip receives direct heat. A grate with suitable spacing can work, but inspect its support pattern before loading a full batch.
Match the rack to chamber shape
- Pellet smokers: A horizontal rack suits the broad chamber when it leaves open routes between fan-driven air, the meat, and the exhaust. Keep the load away from the shelf edges instead of filling every level from side to side.
- Offset smokers: The firebox side generally receives stronger heat. Choose a rack that leaves room to rotate positions, rather than one that only maximizes surface area.
- Electric smokers: Vertical stackable racks make good use of height, provided each shelf has breathing room. Closely packed levels can hold humid air around the strips.
- Compact smokers: Use a smaller footprint instead of forcing a full-size rack into the chamber. Unused space supports circulation better than a tight fit.
Check the handles, corners, and feet, not just the cooking surface. These parts often determine whether the rack sits flat or presses against the walls. A narrow kebab rack or wing rack can serve other grilling tasks, but jerky needs stable, fine support. An Estate Stainless Steel Smoker Tray or a smoker box can add smoke character, but neither replaces a rack that keeps strips separated.
Choose a horizontal rack when the chamber is wide and airflow travels evenly from side to side. Choose a vertical rack when the smoker offers useful height and a dependable draft from intake to exhaust. In both layouts, capacity comes after clearance.
Smoker Setup and Airflow That Delivers Even Drying
Vent position determines whether moisture leaves the chamber or settles back onto the meat. Set the intake and exhaust so air travels across the rack, then exits without passing through a crowded corner. A rack can fit the chamber and still dry poorly if its footprint interrupts that route.
Load each shelf in a single layer. Keep strips separated, and stagger the pieces on neighboring levels so one strip does not sit directly above another. This exposes more surface to moving air and reduces the damp, glossy patches that appear when shelves line up too closely.
Build a steady draft
Open the vents enough to keep air exchanging steadily. Closing them too far traps humid air, while opening them too widely can make heat control difficult. The correct setting varies by cooker, but the operating rule is consistent: drying requires a clear path for moisture to escape.
Keep the heat low and controlled. Jerky drying commonly falls around 140°F to 170°F, while practical smoker instructions often use 160°F to 180°F for roughly 4 to 8 hours. Use texture to judge the finish rather than treating the clock as a guarantee. The strips should feel dry on the surface and bend without remaining wet inside.
Vertical spacing affects airflow as much as the rack's footprint. If the upper shelf sits in the exhaust path, it can dry faster while the lower shelf remains humid. Leave the route from intake to exhaust open, and avoid filling a level from wall to wall when that blocks circulation.
Rotate racks or rearrange strips partway through the cook. Move the shelf nearest the heat away from that zone when possible, and shift edge pieces toward a cooler area. Offset smokers often need more attention near the firebox, while pellet and electric units may benefit from rotating around their chamber's hot and cool zones.
Airflow should reach the meat from more than one direction. Extra cooking time cannot fully correct a shelf that blocks the next one.
Keep drip pans, foil, and solid trays out of the main draft. If a tray must sit below the racks, position it so air can still travel through the chamber. Check the batch after the early drying phase for consistent color and a surface that is drying, not wet or lacquered.
From Prep to Smoke How to Make Jerky on Racks
Start with a lean cut and remove visible fat. Fat doesn't dry like lean muscle and can shorten the keeping quality of the finished jerky. Eye of round is a practical choice because it slices cleanly, but lean beef, turkey, and venison can all work when the pieces are uniform.
Partially firm meat is easier to slice consistently. Cut strips with the grain for a traditional chew, or against the grain for a more tender bite. The important point is consistency. Uneven thickness means thin strips may become brittle while thick strips remain flexible and moist.
Prepare strips for the rack
Marinate the meat for flavor, then drain it thoroughly and pat the strips dry before loading. A wet surface adds drying time and can cause the pieces to stick to the rack. Don't pour marinade over the loaded rack. The liquid runs into the smoker, creates mess, and coats some strips more heavily than others.
Arrange each strip flat, with no overlap. Keep the pieces separated enough for air to pass between them, and leave the rack's edges open where possible. If you're smoking turkey, use the same careful spacing and temperature control as beef. Venison is lean and can dry quickly at thin edges, so inspect it rather than relying on a fixed timer.
Use mild smoke for thin meat. Oak and cherry are restrained choices, while hickory gives a stronger savory profile. Mesquite can become harsh during a long exposure because jerky has little fat to soften the smoke.
Use temperature as a control, not a finish signal
A working range of 160°F to 180°F and a practical window of 4 to 8 hours are outlined in the jerky smoking rack field guide. Your smoker, humidity, marinade, slice thickness, and rack load will change the result, so use those figures as a starting framework.
| Protein | Strip Thickness | Smoker Temp | Estimated Time | Doneness Cue |
|---|---|---|---|---|
| Beef | Consistent thin strips | 160°F to 180°F | 4 to 8 hours | Bends and cracks at the edges without snapping |
| Turkey | Consistent thin strips | 160°F to 180°F | 4 to 8 hours | Dry surface and flexible center, with no glossy wet areas |
| Venison | Consistent thin strips | 160°F to 180°F | 4 to 8 hours | Firm, dry texture that bends rather than breaking cleanly |
Rotate racks or strips when the chamber shows uneven color. Check a piece from the center of the rack and another from a hotter edge. A finished strip should bend without snapping, feel dry, and show no visible surface moisture. If it folds smoothly like raw meat, it needs more time. If it breaks cleanly, the batch may have gone too far, although it can still be useful as a crisper snack.
Let the batch cool before judging the final texture. Jerky firms as it loses residual warmth, so pulling it at the first sign of dryness can leave the center too soft.
Food Safety Cooling and Storage for Lasting Freshness
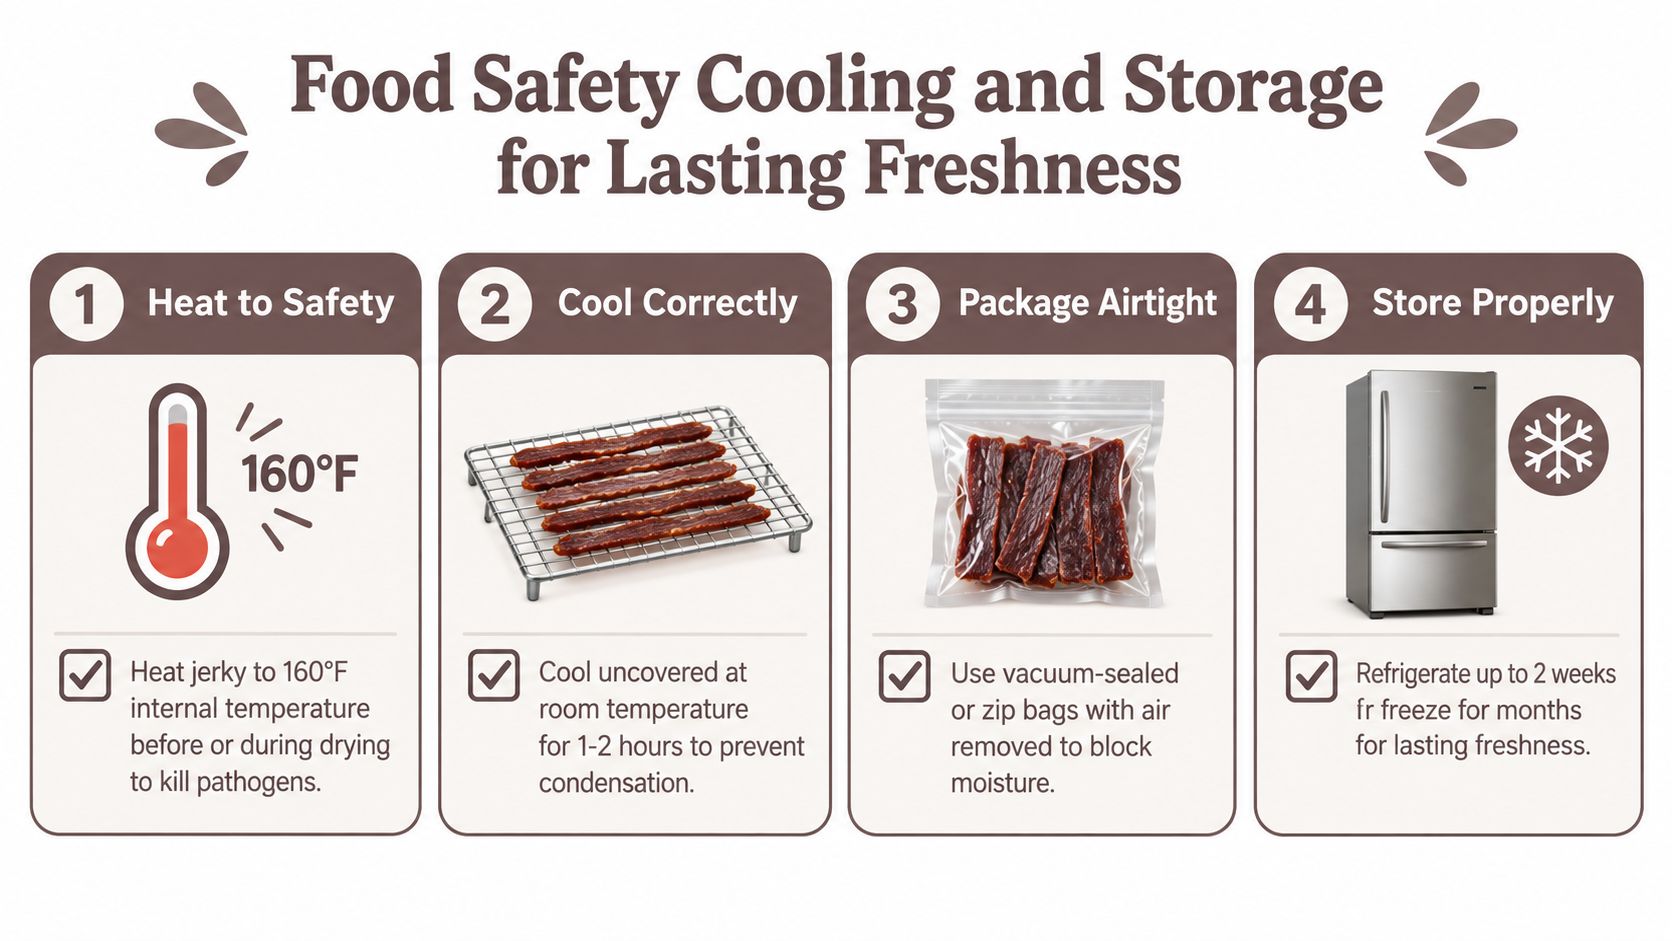
Cool finished jerky uncovered on a clean rack or tray until it reaches room temperature before packaging. Sealing warm strips traps released vapor, which can condense inside the package, soften the surface, and create conditions for spoilage.
Safe handling starts before cooling. Controlled heat, clean preparation, even slices, and a smoker that holds its setting all support pathogen control and moisture reduction. Your rack helps by keeping strips separated and exposed to moving air, but it cannot correct an overcrowded chamber or poor heat control.
Check the batch after cooling
Once the strips are cool, test several pieces from different parts of the rack. Separate any piece that feels wetter or softer than the rest and return it to controlled drying instead of packaging it with the finished batch. A dark exterior does not prove that the center is dry.
Cooling changes the texture. Jerky firms as residual warmth leaves it, so judge flexibility and moisture only after the batch has cooled.
Match storage to drying confidence
Airtight packaging limits moisture exchange and protects texture. Vacuum sealing suits a well-dried batch, while a zip bag with excess air removed works for shorter-term handling. Refrigeration adds protection when dryness is uncertain or when the recipe includes ingredients that make storage more demanding.
- Clean packaging: Use a dry, clean container to limit moisture pickup and contamination.
- Small portions: Package only what you expect to open soon, and keep the remainder sealed.
- Moisture checks: Look for condensation, soft patches, off odors, or visible mold before eating.
- Cold storage: Refrigerate a batch when its dryness is uncertain, and freeze portions you will not use promptly.
Rack-based preservation historically combined sun, wind, smoke, and judgment. A historical summary of smoke racks and jerky-style preservation describes archaeological evidence of smoke racks dating to at least 30,000 years ago, along with Quechua preservation using sun, wind, and smoke around 1550. Modern drying gives that process tighter control through measured heat, rack spacing, and moisture checks.
Rack Care Troubleshooting and Your Next Batch
Clean the rack as soon as the cook ends. Warm water, a suitable dish detergent, and a non-abrasive brush remove marinade residue and smoke deposits without damaging the mesh. Rinse thoroughly and dry the rack completely before storage.
Don't leave stainless mesh wet in a closed cabinet. Stainless resists rust, but residue, trapped moisture, and contact with dissimilar metals can still cause discoloration or corrosion. Store racks flat when possible, or support them at several points so the mesh doesn't bow under its own weight.
Fix the failure at the rack
- Uneven drying: Reduce the load, increase the space around strips, and rotate rack positions. The cause is usually uneven exposure, not a need for more heat.
- Sticky or glossy patches: Separate touching pieces and pat the next batch drier before loading. Surface moisture needs airflow to escape.
- Brittle edges with soft centers: Inspect strip thickness and move the rack away from the strongest heat zone. Thin edges finish first when the chamber's heat distribution is uneven.
- Bitter smoke: Choose a milder wood and avoid prolonged heavy smoke on thin meat. Jerky absorbs smoke readily.
- Warped mesh: Stop stacking heavy items on the rack and store it supported. A distorted surface makes spacing inconsistent.
Before the next batch, measure the chamber again with the rack installed. Confirm wall clearance, check the vertical gap between shelves, and plan where the hottest rack will sit. A narrow load with clean airflow will produce better texture than a larger load packed into every available inch.
A premium outdoor kitchen or patio setup also benefits from dedicated smoker accessories, clean storage, and a rack system selected around the smoker's actual geometry. Treat the rack as part of the cooking equipment, and each batch becomes easier to repeat.
UrbanManCaves.com offers outdoor kitchens, BBQ grills, smoker accessories, fire features, beverage equipment, and furniture for building a more capable backyard entertaining space. Visit urbanmancaves.com to plan the smoker area, storage, and outdoor setup around your next jerky batch.


