

You're standing at the grill with the lid closed, listening to the rotisserie motor hum while a basket of wings turns slowly over the heat. The picture looks effortless, but the result depends on details you can't see from outside. If the basket rubs the lid, the motor lacks torque, or the food sits heavily on one side, the rotation becomes uneven and browning suffers.
A barbecue rotisserie basket is best treated as a compatibility and balance problem before it's treated as a cooking accessory. The basket must fit the grill's spit-to-lid clearance, the motor must handle the loaded basket, and the food must sit so its weight stays centered over the spit. Skip those checks and you may get wobble, motor strain, escaped food, or inconsistent cooking.
The practical sequence is simple: match the basket to the grill, mount and balance it correctly, load it with restraint, control the grease, then clean it while residue is still manageable. That same preparation matters when you're planning a backyard gathering and comparing corporate tailgate gift suggestions, because reliable equipment makes entertaining easier than improvising with tongs and overcrowded grates. For broader outdoor setup ideas, the backyard grilling station guide is also useful context.
Table of Contents
- Picture This on Your Grill Tonight
- Choosing the Right Basket for Your Grill
- Setting Up the Basket the Right Way
- Loading and Cooking Real Food
- Flare-Ups, Grease, and Indirect Heat
- Cleaning and Caring for Your Basket
- Quick Reference for Every Cook
Picture This on Your Grill Tonight
The closed lid hides the part that decides whether the cook succeeds. A properly loaded basket turns smoothly, carries food through the heat without jerking, and exposes each piece to changing positions as it rotates. You can step away from constant flipping, but you can't step away from setup discipline.
Start by checking the physical relationship between the basket and grill. The cage needs enough room to rotate without touching the lid, cooking grates, burners, or heat shields. A basket that fits onto the spit rod may still be wrong for the grill if its outer edge travels too close to the lid or its depth reaches into a burner area.
The motor matters just as much. A light, evenly distributed load is easier to turn than a dense basket packed with wet meat. The effective demand rises when food clumps on one side, because the motor is no longer turning a balanced cylinder. Before buying, confirm the motor's load guidance and consider the weight of the basket itself, not just the food.
Practical rule: An empty basket that spins freely has passed only the first test. The loaded basket must also rotate without drifting, rocking, or forcing the motor to labor.
Balance starts before the food goes in
Food placement determines the center of gravity. Put heavier pieces near the middle, distribute loose items across the basket floor, and keep the load below the upper rail. Irregular foods may need trussing so wings, legs, or loose edges don't catch on the mesh as the basket turns.
Load balancing is not cosmetic. Guidance from Napoleon's rotisserie basket techniques recommends preheating the grill, centering the basket over the rear burner when available, securing the latch or thumbscrews, and starting the motor only after the basket is mounted. It also recommends using a counterbalance when one side is heavier.
That mindset changes how you shop. Don't ask only whether a basket is stainless steel or large enough for wings. Ask whether it fits your grill, whether the motor can turn it, and whether you can load it without creating a lopsided mass. Those answers matter more than the accessory's appearance.
Choosing the Right Basket for Your Grill
Basket shape controls how food moves. Round mesh baskets tumble small pieces continuously, flat mesh baskets hold food in a shallower layer, and split hinged designs make loading and unloading easier while giving you a more rigid enclosure.
Compare the main formats
| Basket Type | Material | Best For | Max Load |
|---|---|---|---|
| Round mesh | Stainless steel or chrome-plated steel | Wings, potatoes, shrimp, and small foods that benefit from tumbling | Use the manufacturer's motor and basket limit |
| Flat mesh | Stainless steel or nonstick-coated mesh | Vegetables, fish, delicate foods, and flatter loads | Keep the load light enough for smooth rotation |
| Split hinged | Stainless steel or chrome-plated steel | Mixed foods and quick access during loading | Follow the basket and motor rating |
A round mesh basket is the most natural choice for foods that need repeated movement. It keeps loose pieces contained and encourages rolling rather than sliding. The trade-off is that very delicate foods can break against the mesh, especially if the basket is overfilled.
A flat basket gives you more control over spacing. Fish fillets, sliced vegetables, and smaller delicate items are less likely to fall into a deep pile. Nonstick-coated mesh can help with release, but coatings require gentler utensils and careful inspection for damage.
Split hinged baskets are convenient, particularly when you're loading several food types or removing food in batches. Their latch and hinge become critical wear points, so a convenient opening mechanism isn't useful if it doesn't close firmly.
Measure before you buy
Measure the distance from the spit rod's centerline to the lid and cooking surfaces. On many kettle and gas grills, a square basket needs at least 1.5 inches of lid clearance, but this is a buying rule from the product guidance in the brief, not a substitute for measuring your own grill. The basket's depth also shouldn't exceed the width of the rotisserie burner box.
Compatibility varies across gas, charcoal, and electric grills. A basket can work across those setups only when the grill has a suitable spit and drive system, as explained in this rotisserie basket compatibility guide. Confirm the spit shape, rod diameter, motor coupling, bracket position, and available clearance before ordering.
For accessory planning, this overview of better BBQ through better gear can help you think beyond the basket itself. Your short checklist should include:
- Latch: It should close securely without forcing.
- Hinge: Look for sturdy alignment and no side play.
- Spit connection: Match the square or keyed section to your rod.
- Motor rating: Confirm the load limit before filling the cage.
- Cleaning: Check whether the manufacturer permits dishwasher use, rather than assuming it does.
- Handle: A detachable handle can simplify mounting and removal. Compare the basket design with this detachable handle grill basket before choosing.
Setting Up the Basket the Right Way
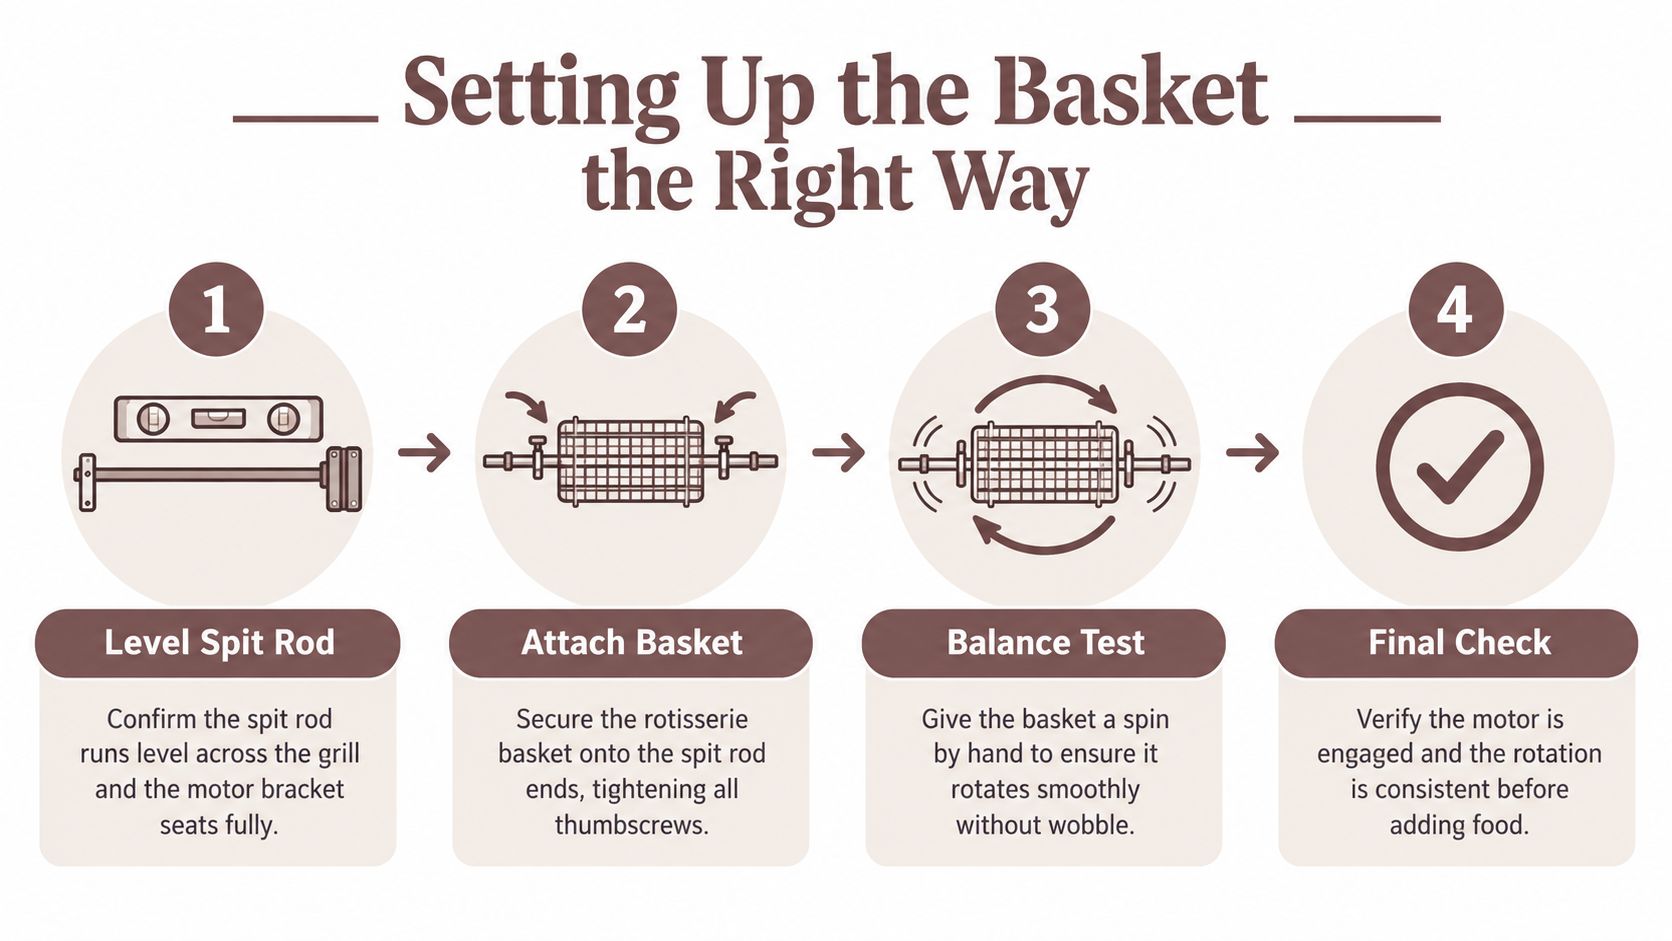
Mounting order matters because every adjustment affects the next one. Set up the drive system first, test the empty basket second, then balance and load it before the final installation.
Follow the sequence
- Level the spit rod. Run the rod across the grill and confirm that it sits level. The motor bracket should seat fully in its mount with no side-to-side play. A tilted rod shifts the load as it turns.
- Test the empty basket. Slide the empty basket onto the spit and turn it by hand. Watch the highest and lowest points of its travel. It should clear the lid, grates, burners, and other internal parts without scraping.
- Install the counterbalance. Thread the counterbalance onto the spit and move it inward or outward until the loaded assembly can turn without drifting. The counterbalance is there to offset an uneven load, not to compensate for a basket that's badly packed.
- Lock the basket square. Tighten the thumbscrews so the basket sits straight on the rod. If the basket twists away from square, the load's center moves off the rotation axis and the motor sees a repeating heavy spot.
- Load before final mounting. Put the food into the basket while it's easy to handle, close the latch firmly, and check that the food remains below the upper rail. Then mount the loaded basket, engage the motor, and confirm the lid clears the highest point.
- Run a short empty test first. Preheat the grill and run the rotisserie burner with the basket empty for a brief test, roughly two to three minutes, using the setup guidance supplied for this cook. Listen for clicking, rubbing, hesitation, or a motor that changes pitch.
Adjust before heat exposes the problem
If the basket rises and falls noticeably, remove it and redistribute the food. Don't try to solve a badly uneven load by tightening the motor connection harder. The motor coupling, basket latch, and spit rod all work better when the load is centered and the assembly turns freely.
A counterbalance can improve a good setup, but it won't rescue food piled against one wall. Spin the loaded basket by hand before switching on the motor. This catches wobble while the basket is still cool and accessible.
For a grill-specific upgrade, compare the mounting arrangement with the Blaze rotisserie kit for a 32-inch four-burner gas grill. The important point isn't the brand name. It's matching the rod, bracket, motor, and basket as one mechanical system.
Loading and Cooking Real Food
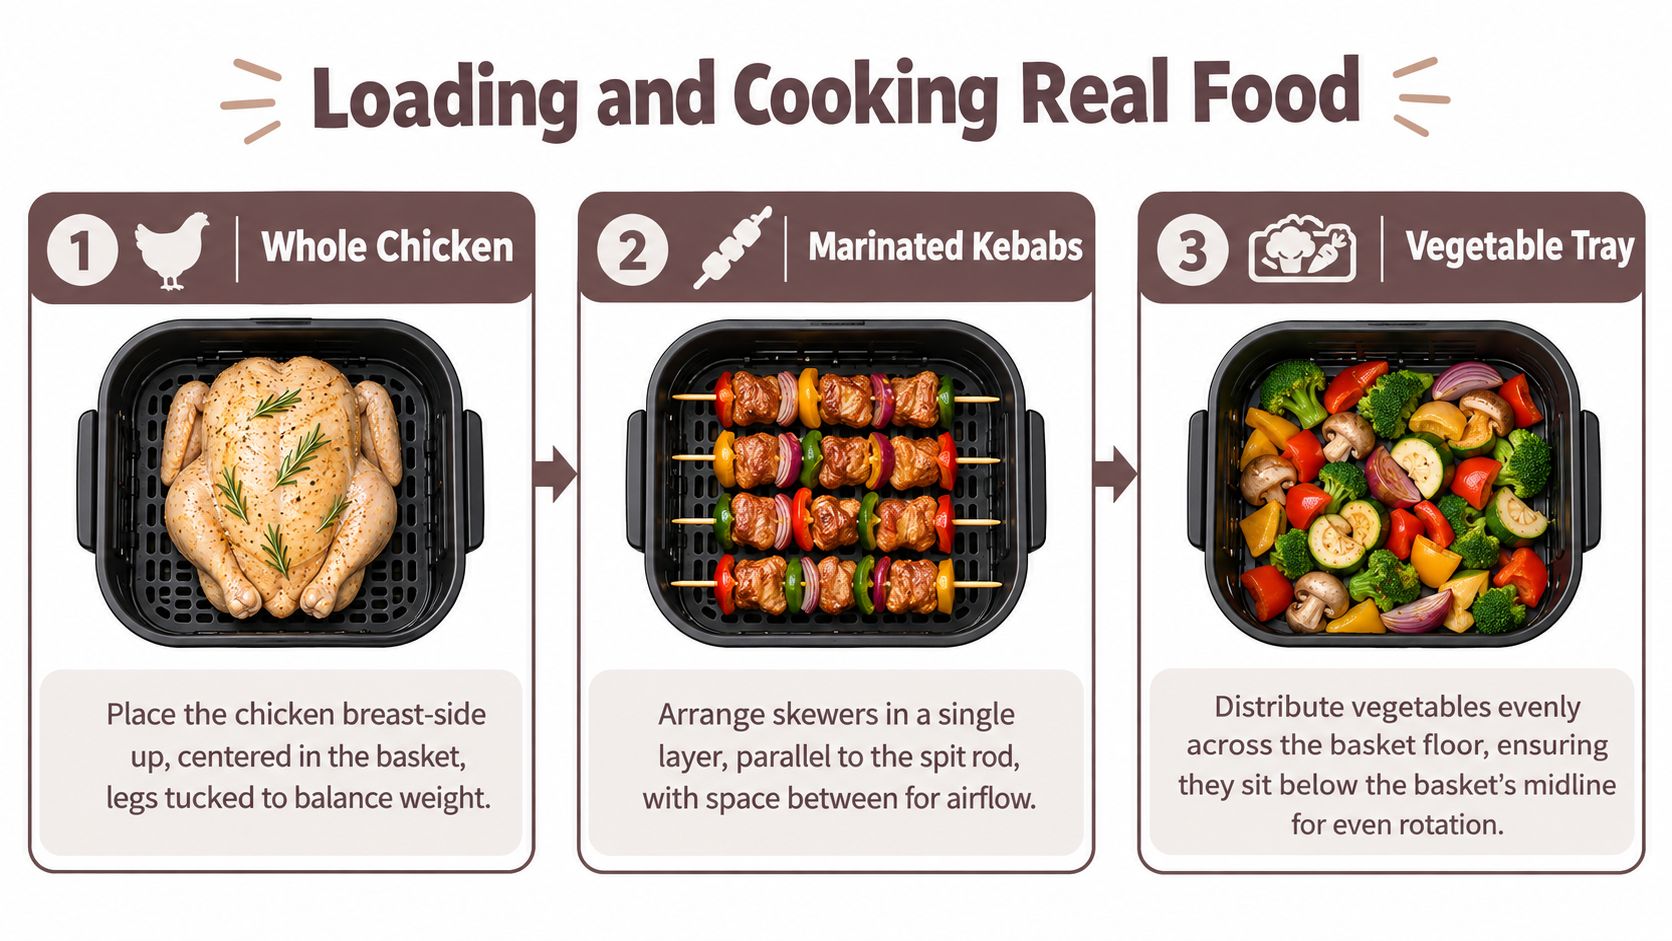
Food should move inside the basket, not become a solid plug. Leave room for pieces to tumble, keep the load below the top rail, and distribute dense items so one side doesn't become heavier than the other.
Whole chicken
A whole chicken is a demanding basket load because the shape is irregular and loose wings or drumsticks can catch on the cage. Truss the legs, tuck the wings, and position the bird centrally rather than pushing it against one side.
Keep the chicken below the basket's top rail. As the bird rotates, any protruding joint can strike the lid or cooking surface. Secure the latch and turn the basket by hand before engaging the motor.
Cook with steady indirect heat and use a thermometer rather than relying on the outside color. A four-pound chicken at 325°F is a useful cook-along example from the supplied guidance, but grill performance varies with wind, lid design, fuel, and basket clearance. Treat the temperature as a starting point and verify the thickest parts with a thermometer.
For a broader whole-bird method, use this guide to barbecue a whole chicken. Leftovers also have a role in planning. This collection of ideas for using leftover rotisserie chicken turns a successful basket cook into more than one meal.
Marinated kebabs
Kebabs need careful spacing because wet marinade can make pieces slide and grind together. Arrange them in a single layer when possible, with the skewers parallel to the spit rod and enough separation for heat to reach each piece.
Very small pieces can fall through mesh or break apart during tumbling. Larger, firm chunks hold their shape better. If the marinade is especially loose, drain the pieces before loading and reserve the sauce for brushing near the end.
The basket's rotation should expose different faces without forcing the food into a compressed pile. If the motor slows each time the basket reaches one position, stop the cook and redistribute the load.
Vegetables
Vegetables cook more evenly when cut into similar sizes and spread across the basket floor. Dense pieces need more time than soft, watery pieces, so combine foods with similar cooking behavior or expect to remove the tender pieces first.
A small foil cup of water can help maintain moisture during a vegetable cook, provided it's secured so it can't slide into the food or interfere with rotation. Don't use it as a substitute for spacing. Steam and moisture won't correct an overloaded basket.
For food that tends to leak through the mesh, give it a quick pre-sear or use a basket with a tighter grid. Loose vegetables, soft cheese-filled items, and fragile seafood are poor candidates when they can break apart before the basket has formed a protective surface.
Flare-Ups, Grease, and Indirect Heat
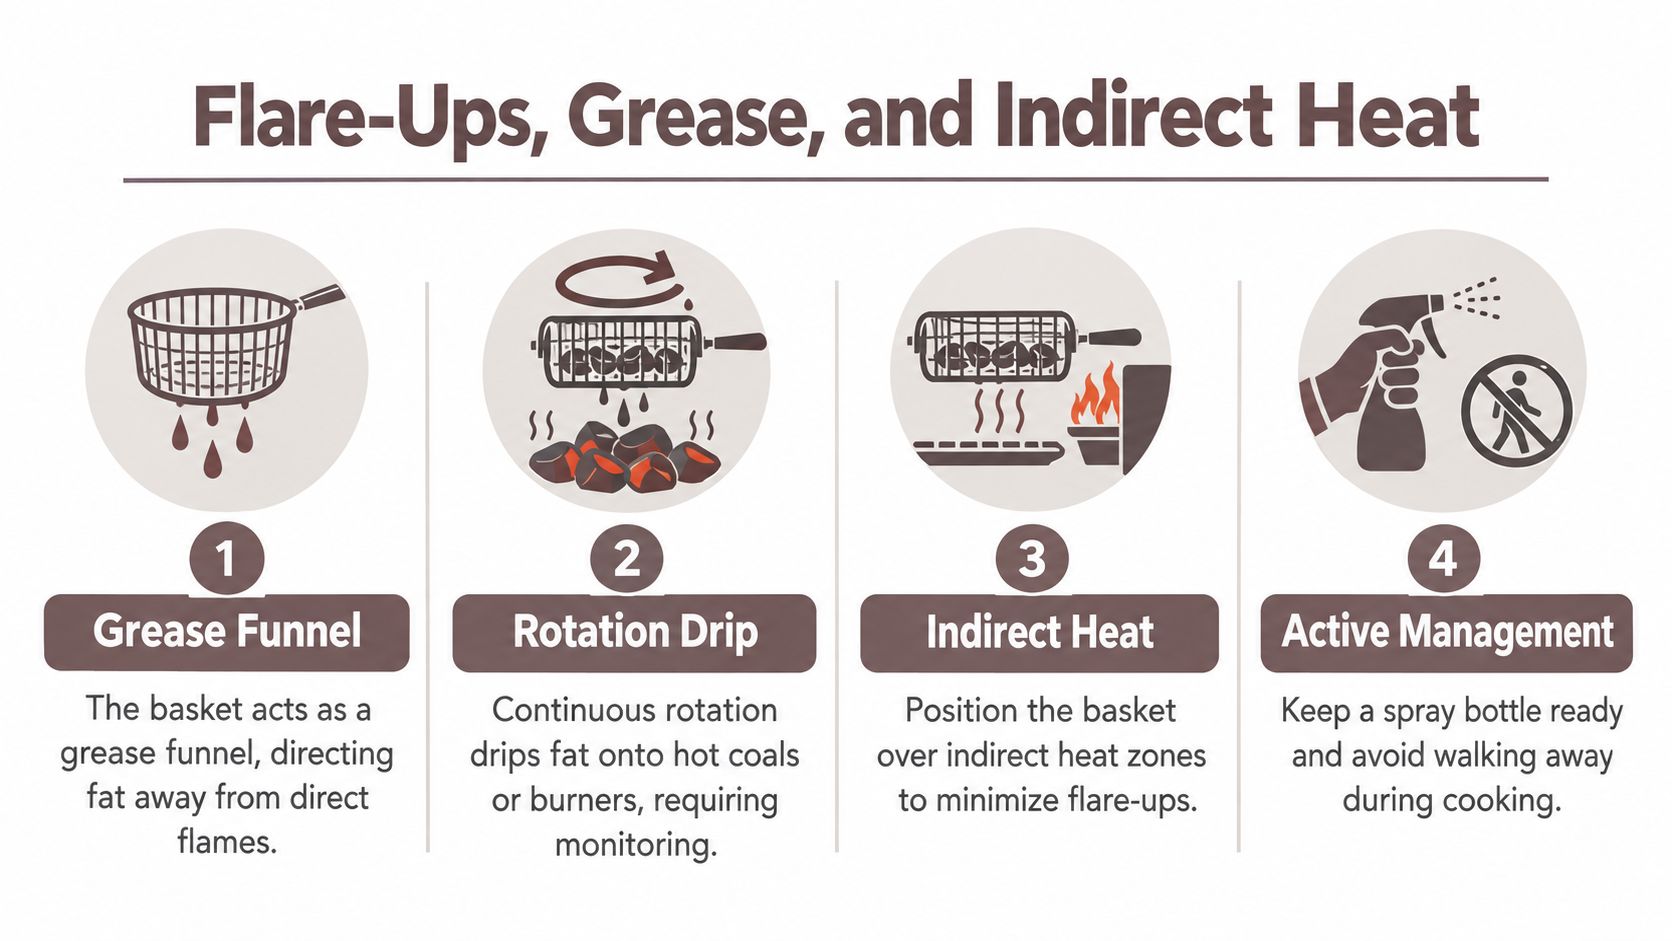
A barbecue rotisserie basket isn't a set-and-forget novelty. It acts like a moving grease funnel, carrying rendered fat and sauce around the grill and releasing drips repeatedly as the food turns.
Direct heat beneath a fatty or sauced load creates the wrong kind of browning. Fat reaches hot burners or coals, flames rise, and the lower edge of the basket can scorch before the rest of the food has cooked. The rotisserie basket cooking guidance from The Spruce Eats recommends avoiding direct heat directly under the food and placing a drip tray beneath saucy or fatty loads.
Build a clean heat zone
On a gas grill, turn off the burner directly under the basket and use the burners to the side for indirect heat when the grill design allows it. On charcoal, bank the coals away from the basket's centerline. The goal is to let hot air and radiant heat cook the food without placing the drippings directly onto the hottest fuel.
Set a drip tray below the basket, not so high that it touches the cage during rotation. A shallow tray catches grease while preserving clearance. If you add water, keep the pan stable and avoid filling it so high that sloshing liquid reaches the food.
Monitor the cook instead of relying on the lid to hide it. Sauces should be applied late, after the food has developed some structure. Thin pieces, fatty skin, and sugary coatings need particular attention because they can burn quickly once the basket moves them over a hot spot.
Treat flames as a setup failure
A small flare can become a sustained burn when the basket keeps feeding drips into the same heat source. Keep long tongs and a spray bottle nearby, but don't use water as the primary solution for a grease fire. Shut down the fuel source when possible, close the lid if it's safe, and follow your grill manufacturer's fire guidance.
Safety rule: Never let flames lick the lower edge of the basket.
If flames appear, move the basket away from the direct heat zone, reduce the burner or coal intensity, and check the drip tray. A clean, stable indirect setup should produce steady browning rather than blackened patches and smoke that overwhelms the food.
Cleaning and Caring for Your Basket
Clean the basket the same night you use it. Grease hardens in the mesh, around the latch, and inside hinge joints, turning a simple rinse into a stubborn repair job.
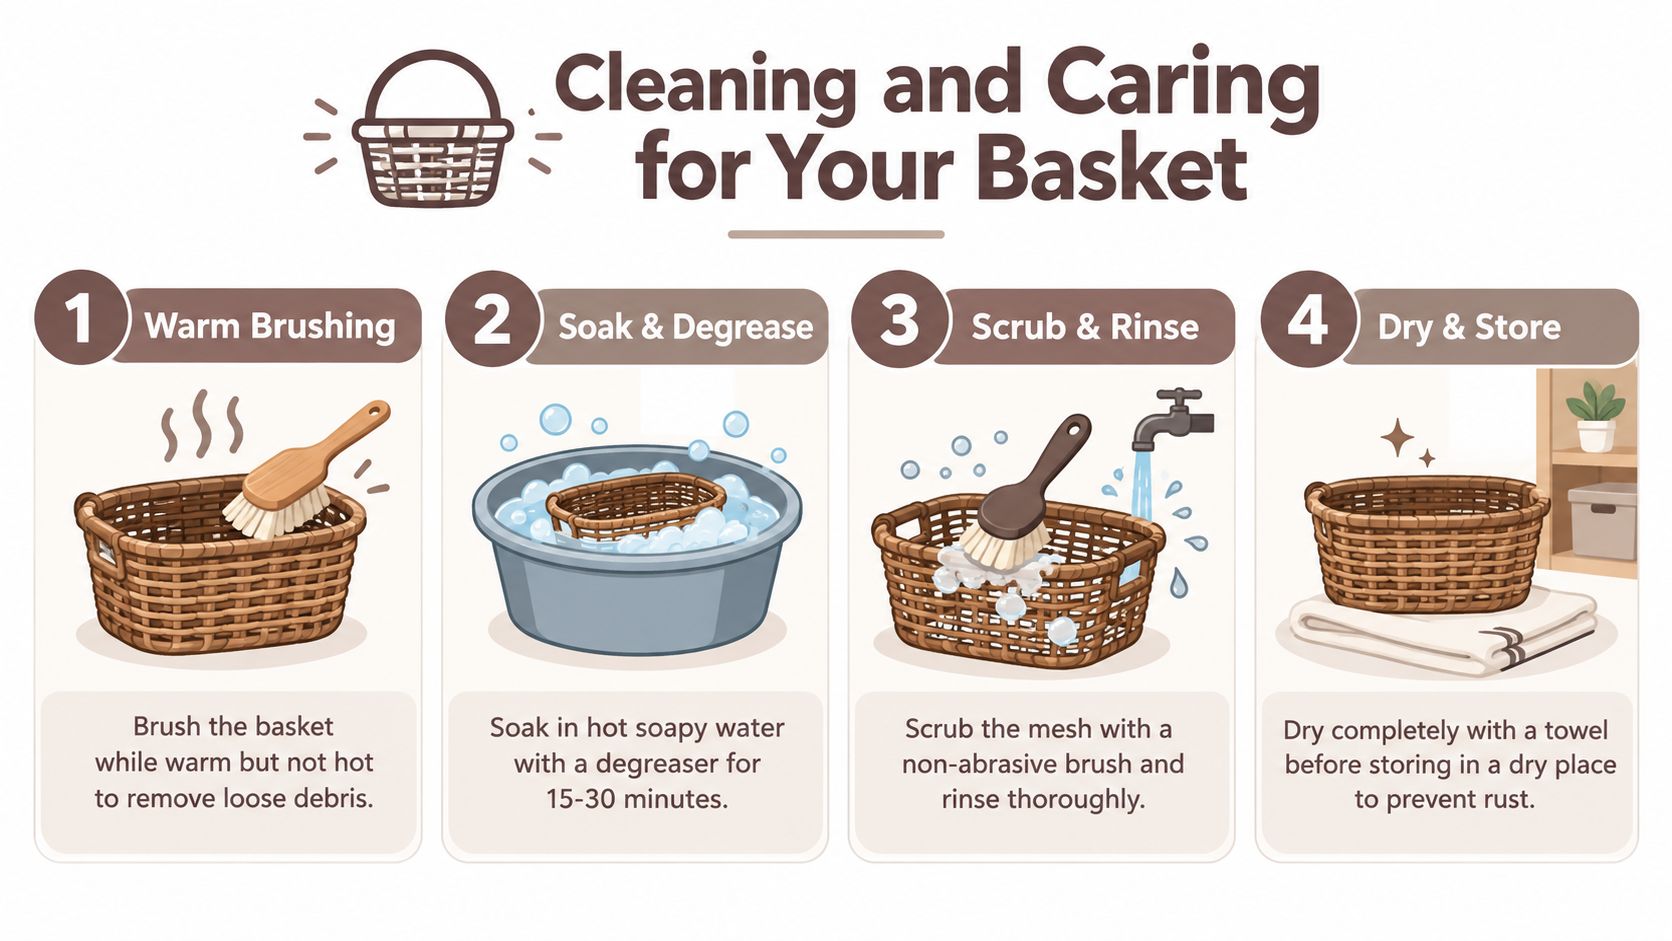
Let the basket cool until it's warm but safe to handle, then brush away loose debris. Don't plunge a dangerously hot basket into water, and don't leave it outside overnight where residue can attract moisture and pests.
Remove grease before it sets
Soak the basket in hot soapy water with a suitable degreaser. Work the mesh with a brass or other non-abrasive brush rather than steel wool, which can scratch finishes and leave metal fragments behind.
Pay close attention to the latch spring, hinge pins, thumbscrews, and spit connection. Sticky residue in the latch can prevent full closure, while grease around the mounting point can make the basket harder to seat squarely.
Inspect before storing
Dishwasher use depends on the manufacturer and basket construction. Thin wire cages and moving latch parts can warp or deteriorate during harsh cycles, so follow the care instructions rather than assuming dishwasher safety.
Rinse away all degreaser, dry the basket completely with a towel, and store it where air can circulate. Check the latch for stretch or rust, inspect the spit connection for distortion, and make sure the counterbalance still moves and locks properly.
A monthly inspection should include the spit prongs and motor coupling. If the prongs no longer align or the coupling shows wear, fix the issue before loading food. The same cleaning discipline used for cleaning BBQ grill grates applies here, with extra attention to hinges and enclosed mesh.
Quick Reference for Every Cook
Print this checklist and keep it near the grill. It's designed for the moment when the basket is loaded, the grill is hot, and you need the important decisions in front of you.
Basket selection
- Clearance: Measure the loaded basket's full rotation path, including lid and grate clearance.
- Spit match: Confirm the rod shape, diameter, length, bracket position, and motor coupling.
- Load limit: Compare the basket's food capacity with the motor's stated rating.
- Mesh choice: Use round mesh for tumbling foods, flat mesh for delicate or flatter items.
- Latch quality: Choose a latch that closes firmly and remains easy to inspect.
Pre-cook setup
- Level rod: Seat the spit rod and motor bracket without side play.
- Empty test: Spin the empty basket by hand before adding food.
- Counterbalance: Position the counterweight to offset the loaded basket.
- Load position: Keep food below the top rail and center dense pieces.
- Drip tray: Place a stable tray beneath fatty or sauced foods over indirect heat.
Active cooking
- First check: Observe the first rotations for wobble, rubbing, or motor hesitation.
- Chicken: Use a thermometer to verify doneness in the thickest parts.
- Small foods: Stop the cook if pieces escape, break apart, or collect on one side.
- Sauce: Apply sticky coatings late enough to limit burning and flare-ups.
- Flames: Never allow fire to reach the basket's lower edge.
Post-cook care
- Brush timing: Brush the basket while it's warm, not dangerously hot.
- Degrease: Soak and scrub before grease hardens in the mesh and latch.
- Latch check: Inspect springs, hinges, and thumbscrews for residue or damage.
- Dry fully: Towel-dry every joint and wire intersection.
- Store well: Hang or place the basket in a dry area with airflow.
UrbanManCaves.com offers grill rotisserie kits and related outdoor-living equipment for homeowners building more capable entertaining spaces. Visit urbanmancaves.com to compare compatible grill accessories, outdoor kitchen equipment, and products that can support a cleaner, more dependable barbecue setup.


